Contouring has become one of the most popular makeup techniques for achieving a sculpted, defined face. Whether you’re preparing for a special occasion or just want to enhance your everyday look, contouring can make a significant difference. While it might seem complicated at first, with the right technique and tools, anyone can learn how to contour like a pro. Here’s your beginner’s guide to mastering this skill in just a few simple steps.
1. Know Your Face Shape
Before you begin, it’s essential to understand your face shape. Contouring should be tailored to your unique features, so knowing the shape of your face helps determine where to apply the contour. Common face shapes include oval, round, square, heart, and diamond, and each shape requires different contouring techniques.
- Oval Faces: You might not need as much contouring since your face is already well-balanced. A light contour along the sides of your forehead and under your cheekbones should suffice.
- Round Faces: To create more definition, focus on contouring the sides of your forehead, along the cheekbones, and under the jawline to elongate the face.
- Square Faces: Soften the angular jawline by applying contour around the temples and the sides of your cheeks.
- Heart-Shaped Faces: Contour the sides of your forehead to narrow it and add contour along the jawline for balance.
- Diamond Faces: Soften sharp angles by contouring the forehead, sides of the cheeks, and jawline.
Understanding your face shape will help you achieve a more natural and flattering contour.
2. Choose the Right Products
When selecting contour products, consider your skin type and tone. There are various products available, including powder, cream, and stick formulas. Each offers a different finish and effect.
- Powder Contour: Ideal for oily or combination skin. Powder formulas are easy to blend and can be built up for a more subtle or intense contour.
- Cream Contour: Best for dry skin, cream contour provides a dewy, blended finish. It offers more flexibility and can create a more dramatic effect.
- Contour Sticks: These are beginner-friendly as they are easy to apply and blend. They’re available in both cream and powder formulas, and their convenient shape makes them great for on-the-go application.
For a natural look, choose a contour shade that is 1-2 shades darker than your natural skin tone. If you’re looking for a more dramatic contour, go a few shades darker.
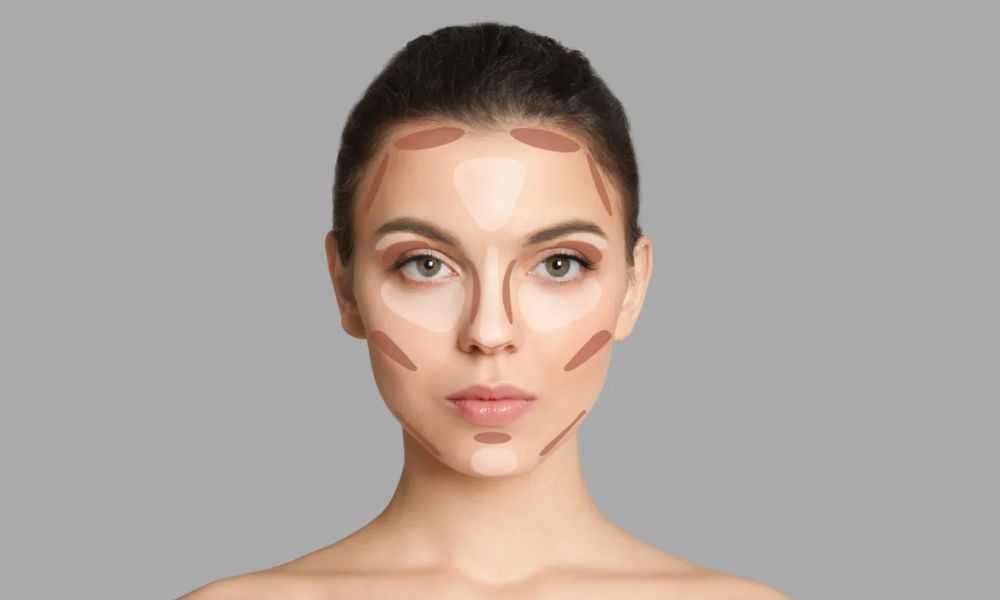
3. Map Out Your Contour Zones
Once you have your products ready, it’s time to figure out where to apply them. Contouring typically focuses on three main areas: the cheekbones, forehead, and jawline. Here’s where to apply the contour:
- Cheeks: To create the illusion of higher cheekbones, apply contour in the hollows of your cheeks. Suck in your cheeks to find the natural indentation, then blend upwards towards your temples.
- Forehead: If you want to minimize the appearance of a large forehead, apply contour along your hairline. Blend it downward to make your forehead appear smaller.
- Jawline: To define your jawline, contour just beneath the chin and along the jawbone. This will create a more sculpted look and give your face a sharp, chiseled appearance.
You can also contour your nose for a more refined look. Apply contour along the sides of your nose, blending it gently to create a slimmer effect.
4. Highlight the High Points
Contouring isn’t complete without highlighting the high points of your face. Highlighting adds light and dimension to areas that naturally catch the light, enhancing the effect of your contour.
- Cheekbones: Apply highlighter on top of your cheekbones to make them appear more prominent.
- Nose: A small dab of highlighter down the center of your nose can create the illusion of a straighter nose.
- Forehead: A light highlight along the center of your forehead brightens your complexion and brings balance to your face.
- Chin: Add a subtle highlight on your chin to create harmony between the upper and lower parts of your face.
Use a light hand when applying highlighter—subtlety is key to a natural glow.
5. Blend, Blend, Blend
The most important step in contouring is blending. Harsh lines can make the contouring look unnatural. Blending ensures that the contour and highlight meld seamlessly into your skin for a smooth, airbrushed finish.
- Tools: Use a makeup sponge, blending brush, or even your fingers to blend contour products. A damp makeup sponge is excellent for blending, as it helps create a flawless finish without disrupting your foundation.
- Techniques: Start blending from the outer edges of your contour and work inward, using circular motions. For the most natural look, focus on softening the contour lines, especially around the jawline and cheekbones. The goal is to create a shadow without any visible lines.
Don’t rush through blending. Take your time to ensure everything is seamless and well-integrated with your skin.
Aditi Dubey
Aditi Dubey is a highly skilled and passionate freelance makeup artist in Dwarka, known for her ability to create stunning and personalized looks for every client. With a focus on enhancing natural beauty, Aditi brings a fresh and radiant approach to makeup, whether it’s for a bride’s special day or any other event. Her meticulous attention to detail, professional techniques, and dedication to ensuring her clients feel confident make her a trusted name in the industry. Aditi tailors each makeup application to suit the client’s style, personality, and vision, ensuring they look and feel their best. Whether you’re after a soft, elegant look or a bold, glamorous transformation, Aditi’s expertise guarantees a flawless finish that highlights your unique beauty.
Final Thoughts
Contouring may seem like a complex technique, but once you understand the basics, it’s easy to incorporate into your makeup routine. Start by identifying your face shape, choosing the right contour products, and mapping out where to apply contour and highlight. Remember that blending is crucial to achieving a natural, flawless look. With practice, you’ll soon be able to contour like a pro and enhance your natural features with confidence.
Don’t Miss: Choosing the Perfect Makeup Artist for Your Special Day